

Using Checkpoint Avanan and Microsoft 365 Quarantine
Throughout this article I'll be refering to Avanan as "Checkpoint" now that it has been acquired by Checkpoint and merged into their product line.
Last updated 12 December 2023
Checkpoint system version PROD_2023_w49_6
Intro
I work for an Australian MSP servicing SMB clients. Earlier this year we began replacing our previous security email gateway service with Checkpoint Protect/Avanan throughout our client setups.
One issue we struggled with during our initial deployment was handling quarantined messages. Most SEG solutions require you to replace your domain's MX record with the SEG's mailserver and create transport rules in Exchange to completely bypass 365's spam filtering. Checkpoint on the other hand works in addition to Exchange's built in protection by scanning emails using APIs. This means your emails are protected with an additional layer of security through Exchange Online Protection/Defender for Office 365 but also means you're now managing two sets of filtering policies and importantly, two sets of quarantine systems.
Having to deal with two sets of quarantine systems adds unnecessary complexity for end users as well as techs. Users would receive digests from both systems, and would need to deal with two different UIs for viewing & releasing email. Similarly, techs would need to check two systems when investigating quarantined emails and we needed to separately integrate both Checkpoint and 365 quarantine into our ticketing system. Luckily since June 2023 Checkpoint has a new "Unified Quarantine" feature that combines emails quarantined by Microsoft and Checkpoint into a single end-user digest as well as a single portal for techs to action quarantined items.

Enabling Unified Quarantine notifications
Unified Quarantine digests will contain a list of emails that have been quarantined by both Checkpoint and Microsoft since the last digest. Users can then release, or request release quarantined emails per your Checkpoint Office 365 Mail policy (for emails quarantined by Checkpoint) and the Microsoft release options policy configured in the steps below (for emails quarantined by Microsoft.)
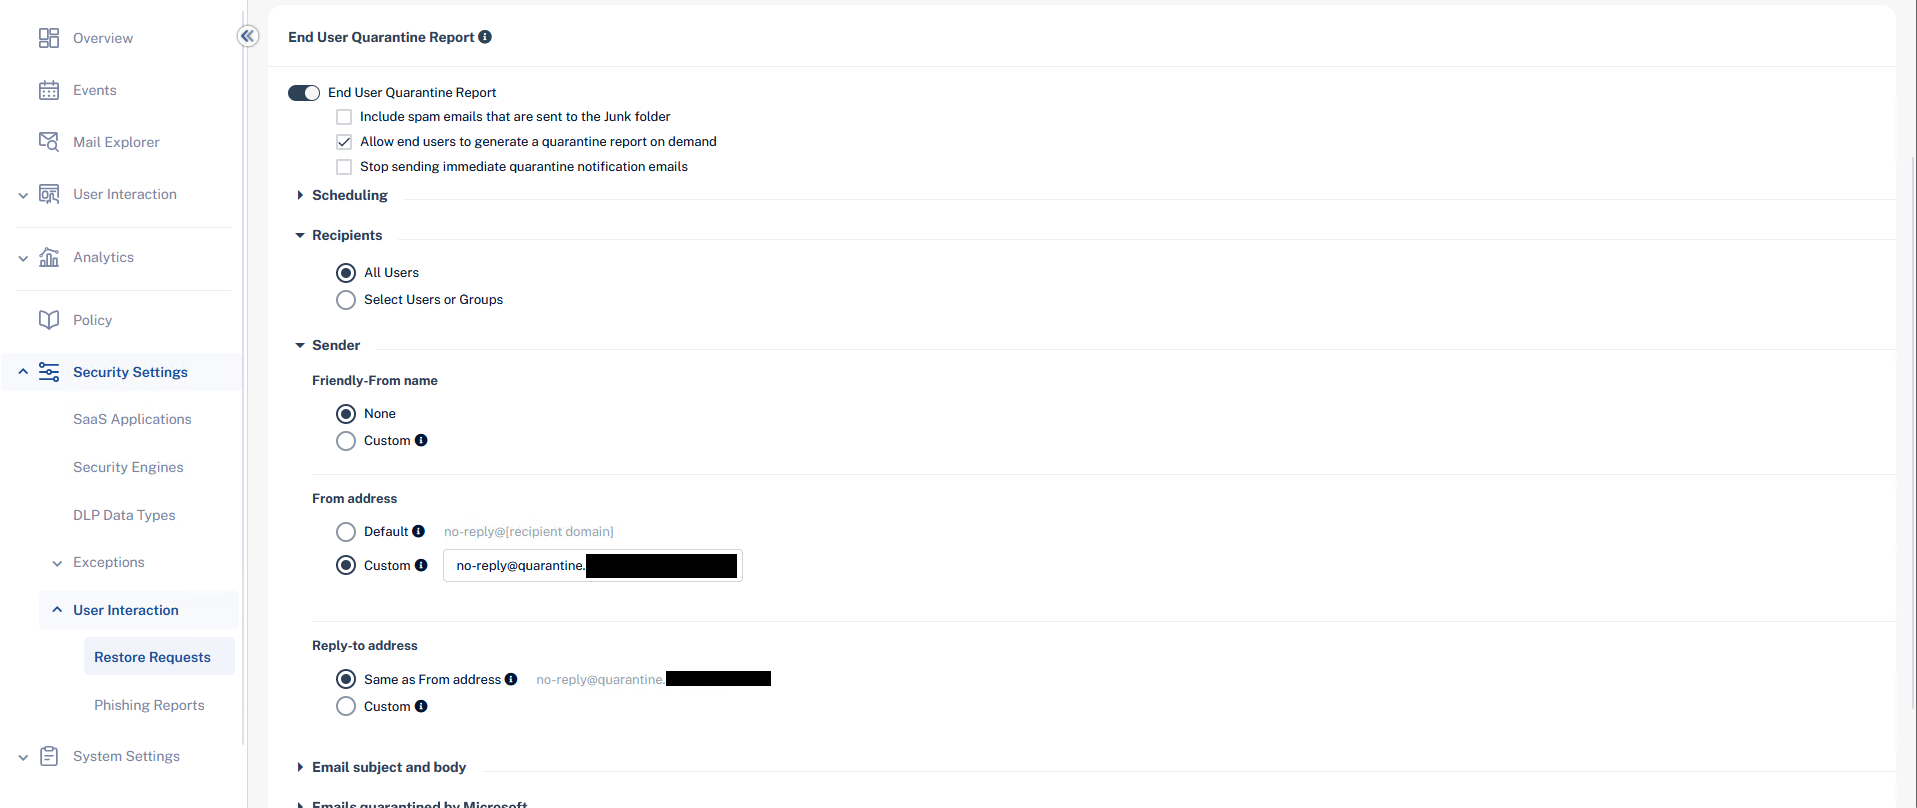
- From your Checkpoint tenant, expand Security Settings > User Interaction > Restore Requests.
- Enable End User Quarantine Report.
- If desired, tick "Include spam emails that are sent to the Junk folder", "Allow end users to generate a quarantine report on demand", and "Stop sending immediate quarantine notification emails". I normally enable "Allow end users to generate a quarantine report on demand" while leaving the other two disabled.
- Expand the Scheduling section and create your desired schedule. This could be once a day, once every hour, 10am & 4pm, etc.
- Expand Recipients and select All Users.
- Expand Sender and set the following options:
- Friendly-From name: This sets the From header display name. You can set whatever name you want or leave it blank. If left blank the full sender address will be displayed in the user's email client.
- From address: Change to Custom and set the address as
no-reply@quarantine.[yourdomainhere]e.g.no-reply@quarantine.danclowry.com. The section "High-Confidence Phish & Secure By Default" further down this article explains why the "quarantine" subdomain is used rather than leaving the address as the defaultno-reply@[recipient domain]. - Reply-to address: Leave as Same as From address
- Expand Emails quarantined by Microsoft and tick "Daily quarantine report should include emails quarantined by Microsoft"
- Set the release options for Microsoft quarantined emails. Below are the default actions:
- Malware: Can request a restore (admin needs to approve)
- High Confidence Phishing: Can request a restore (admin needs to approve)
- Phishing: Can request a restore (admin needs to approve)
- High Confidence Spam: Can restore on their own
- Spam: Can restore on their own
- Bulk: Cannot restore
- Transport Rule: Cannot restore
- Click Save and Apply to save the notification settings
Checkpoint will now begin sending quarantine digests to end users per your configured schedule. Job done right? Unfortunately not...
High-Confidence Phish & Microsoft 365 Secure by Default
After configuring unified quarantine notifications for our clients, I quickly noticed that Checkpoint's digest emails were being quarantined by 365 as "high confidence phish". I initially tried creating an Exchange transport rule to set the SCL to -1 for any emails coming from a Checkpoint IP with sender no-reply@[customerdomain] to bypass EOP spam filtering. However even after creating the transport rule, digests were still getting quarantined by 365 as high confidence phish.
After further digging, I found that this was because of 365's "secure by default" feature where Microsoft will ignore common EOP overrides for emails detected as malware or high confidence phishing. In Microsoft's own words:
Because Microsoft wants to keep our customers secure by default, some tenants overrides aren't applied for malware or high confidence phishing. These overrides include:
- Allowed sender lists or allowed domain lists (anti-spam policies)
- Outlook Safe Senders
- IP Allow List (connection filtering)
- Exchange mail flow rules (also known as transport rules)
Microsoft will only enable secure by default when the MX record for your domain is the default protection.outlook.com record. Because Checkpoint uses APIs rather than a traditional MX record replacement, secure by default is switched on and cannot be disabled.
So how can you stop 365 from quarantining Checkpoint's digests? Microsoft lists four ways you can override secure by default:
- Phishing simulations: Simulated attacks can help you identify vulnerable users before a real attack impacts your organization. To prevent phishing simulation messages from being filtered, see Configure third-party phishing simulations in the advanced delivery policy.
- Security/SecOps mailboxes: Dedicated mailboxes used by security teams to get unfiltered messages (both good and bad). Teams can then review to see if they contain malicious content.
- Third-party filters: Secure by default only applies when the MX record for your domain is set to Exchange Online Protection (contoso.mail.protection.outlook.com). If it's set to another service or device, it's possible to override Secure by default with a Transport Rule to bypass all spam filtering. When Microsoft detects messages as High Confidence Phish with this rule in place, they still deliver to the Inbox.
- False positives: To temporarily allow certain messages that are still being blocked by Microsoft, use admin submissions. By default, allow entries for domains and email addresses, files, and URLs exist for 30 days. During those 30 days, Microsoft learns from the allow entries and removes them or automatically extends them. By default, allow entries for spoofed senders never expire.
Security/SecOps mailboxes won't work as that'll just redirect everyone's quarantine digests to a single mailbox (as well as any other actual spam filtered by EOP), changing the MX record isn't possible due to how Checkpoint works, and submitting the quarantine digests as false positive detections in Defender would work OK for a single deployment, but doesn't scale when you're managing dozens or hundreds of tenants.
Configuring a phishing simulation is what we'll use. This is basically the same as a spam bypass transport rule and will set Exchange's SCL to -1 for Checkpoint's digests.
Configuring a Phishing Simulation
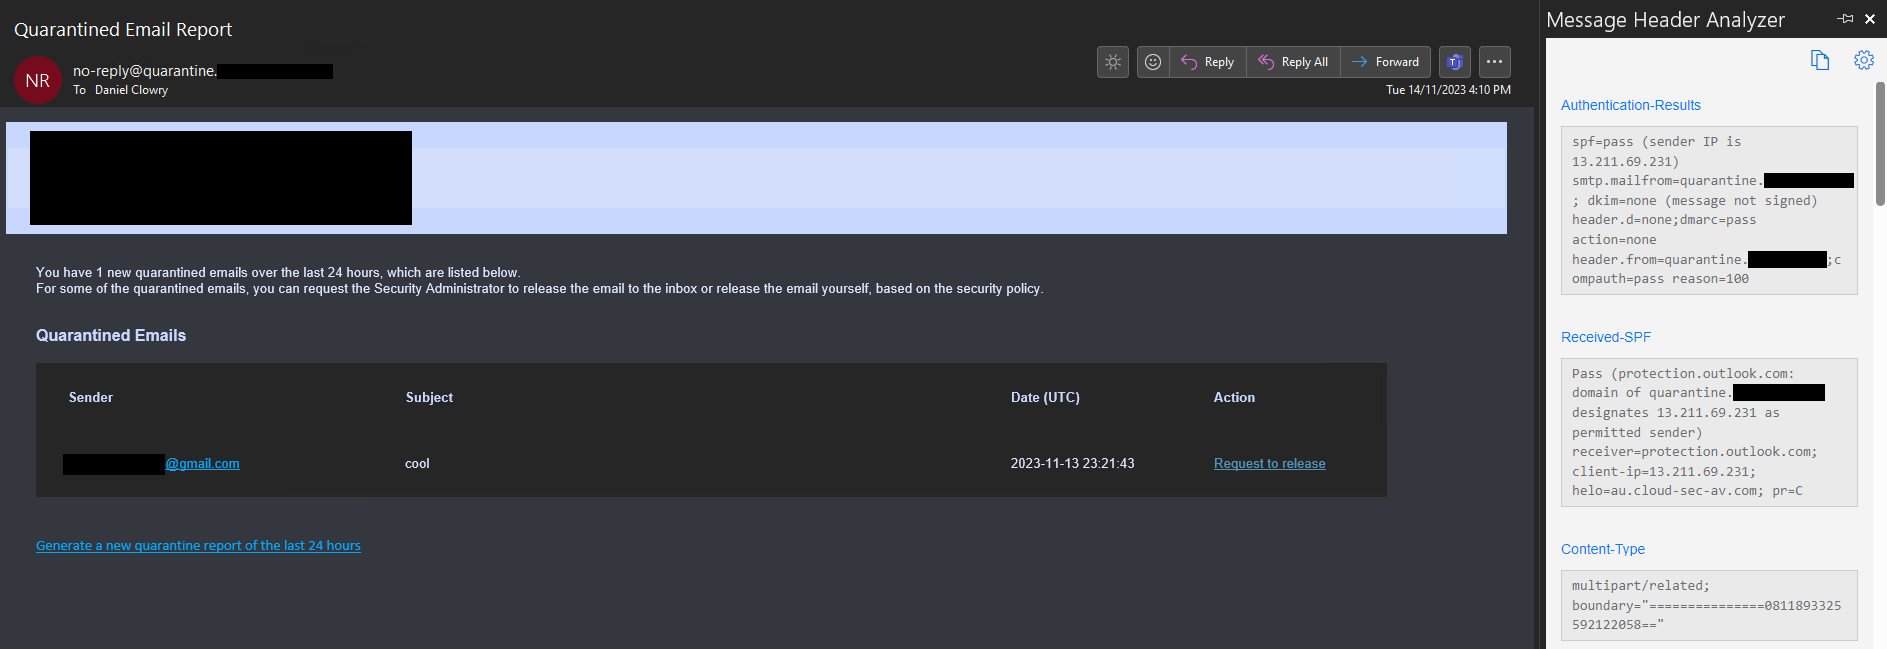
Before you can create the phishing simulation you'll need to figure out what IP address your Checkpoint digest emails are sent from so you can add it to the phishing simulation policy. Checkpoint specifies its mailserver IP addresses in its spfa.cpmails.com SPF record. At the time of writing, the SPF record contains 12 IPv4 addresses. Microsoft only allow up to 10 addresses to be added to a phishing simulation policy so you can't just add all 12 addresses to your policy. Luckily, Checkpoint seems to send all its notification emails from a single IP (likely based on your tenant's configured location). For all of our tenants in Australia, Checkpoint sends its digests from the 13.211.69.231 IP address (which has a PTR record of au.cloud-sec-av.com). Check your previous Checkpoint digests to figure out what IP address Checkpoint uses on your tenant.
Once you've found what IP Checkpoint uses, you're ready to create a phishing simulation policy. To create the policy:
- Login to your 365 tenant and go to the Microsoft 365 Defender portal.
- Go to Policies & rules > Threat policies > Advanced delivery > Phishing simulation.
- Click Add to open the Add Third Party Phishing Simulations flyout.
- Configure the phishing simulation options:
- Expand the Domain option and enter the
quarantine.[yourdomainhere]domain you set in Checkpoint. - Expand the Sending IP option and enter the IP Checkpoint sends its emails from.
- Leave Simulation URLs to allow blank as this isn't required for emails.
- Expand the Domain option and enter the
- Click Add to save the policy.
Exchange will now bypass its spam filtering for all emails sent from the quarantine.[yourdomainhere] address if they were sent through your specified Checkpoint IP. If an email does not match both the domain AND IP conditions, Exchange will treat it as a regular email and it will be subject to EOP filtering.
Protecting the quarantine subdomain from spoofing
It is important to configure an SPF and DMARC record for the quarantine subdomain to prevent an attacker from spoofing it either internally or externally.
Since July this year Exchange Online has begun honoring domain DMARC policies by default. I.e. if a domain's DMARC policy has a value of p=reject, Exchange will return an NDR to the sender and refuse to deliver the message. If a domain has a DMARC policy of p=quarantine, EXO will move the message into 365 quarantine.
We can create an SPF record alongside a DMARC record for the quarantine subdomain to ensure that Exchange will always reject emails unless they were sent from one of the Checkpoint servers.
Add the following two TXT records to your domain's zone:
| Type | Name | Value | TTL |
|---|---|---|---|
| TXT | quarantine | v=spf1 include:spfa.cpmails.com -all | Default |
| TXT | _dmarc.quarantine | v=DMARC1; p=reject; aspf=s; adkim=s; | Default |
The SPF record informs recipient servers that the Checkpoint mail servers are the only permitted senders for the domain. The DMARC record then informs recipient servers that they should reject all messages that fail SPF validation.
Now if a third-party tries to spoof the quarantine subdomain, the message will be immediately rejected by Exchange with the response:
550 5.7.509 Access denied, sending domain quarantine.danclowry.com does not pass DMARC verification and has a DMARC policy of reject.Conclusion
Now that you've configured Checkpoint Unified Quarantine your users will only have to worry about checking a single report to view their quarantined messages.